

Key takeaways
- The desktop app records system audio automatically. There’s no toggle to find. On Mac, grant it screen recording permission first.
- In the Chrome Extension, pick the Chrome Tab pane and turn Also share tab audio on, or the Entire Screen pane and turn Also share system audio on.
- By default the Chrome Extension captures microphone audio (and speaker audio your mic picks up from the room), but not the system audio stream.
- This route works only in Google Chrome. You can enable microphone plus computer audio together to capture your voice and the system sound at once.
- For the pane-by-pane detail and screenshots, see record screen and computer audio.
Which method to use
Recording in the desktop app? Stop here, it already captures system audio. The steps below are only needed in the Chrome Extension, where system audio is off by default.
- Microphone audio (your voice).
- Speaker audio (if your mic picks it up from the room).
How to record system audio in the Chrome Extension
- Click here to install the Chrome Extension
- Open the Chrome tab that has the audio you want to record (e.g. YouTube, webinar, music).
- Click the Sendspark Chrome Extension icon.
- Select Screen Only or Cam + Screen, then hit RECORD.
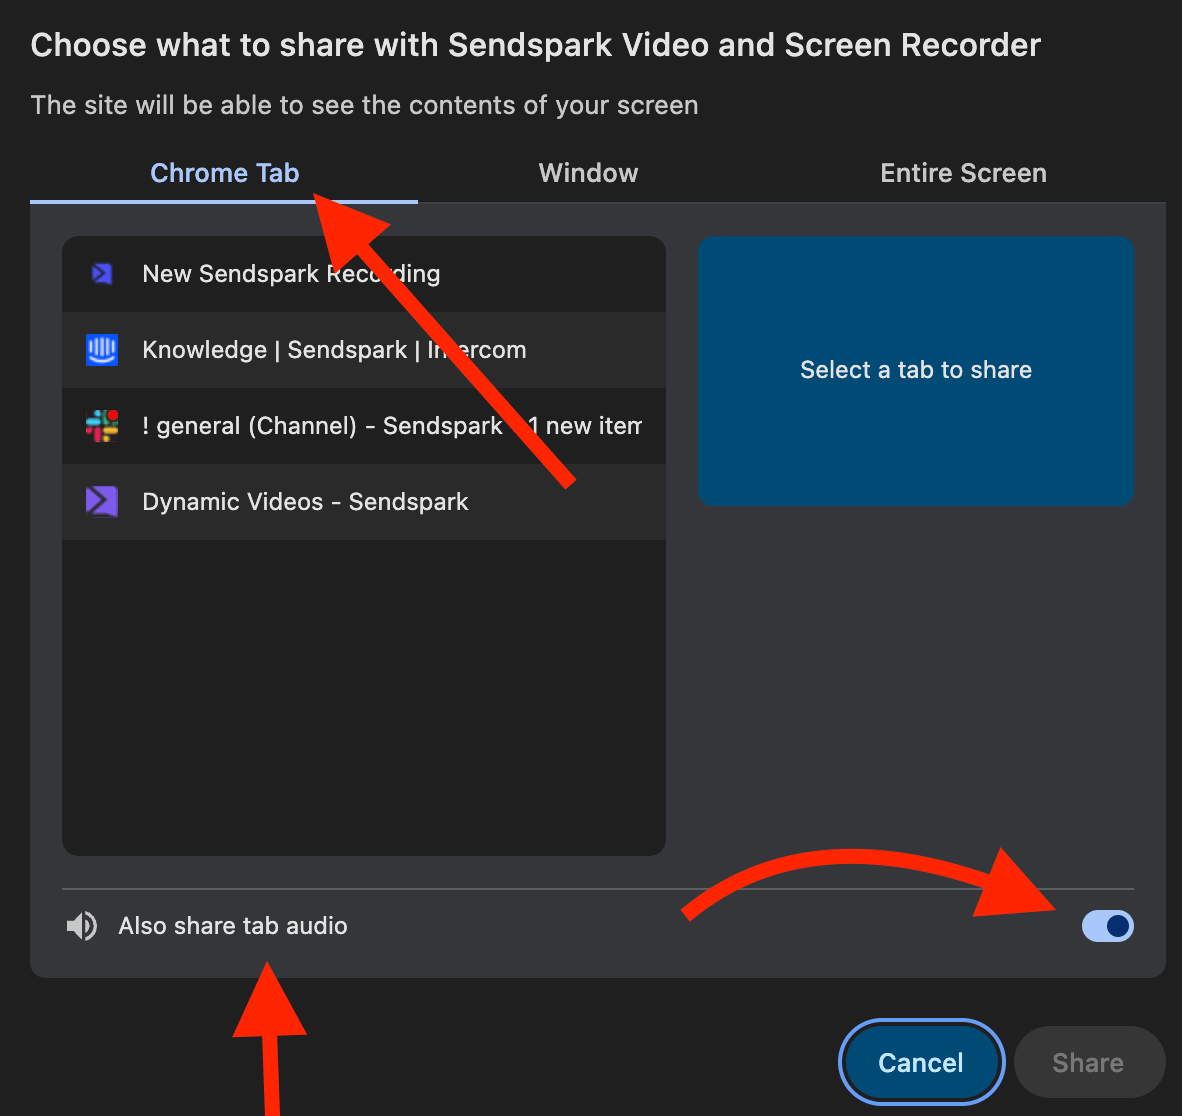
- In Chrome’s share window, select the Chrome Tab pane and pick your tab.
- Turn the Also share tab audio toggle on at the bottom of the window.
- Click Share. Sendspark captures both the video of the tab and its audio.
Notes and limitations
- This route works only in Google Chrome.
- The Window pane has no audio toggle. Use Chrome Tab or Entire Screen.
- The desktop app needs none of this, because it records system audio automatically. On Mac, grant it screen recording permission first.
- You can also enable both microphone and computer audio if you want to record your voice and the system sound together.
Frequently asked questions
Can the desktop app record system audio?
Can the desktop app record system audio?
Yes, and it does so automatically, so there’s nothing to enable per recording. On Mac, grant the app screen recording permission first. The share-window steps on this page apply to the Chrome Extension, where system audio is off by default. See record screen and computer audio.
How do I capture the sound from a YouTube video or webinar?
How do I capture the sound from a YouTube video or webinar?
In the Chrome Extension, open the tab with the audio, click the Sendspark Chrome Extension, select Screen Only or Cam + Screen, then in Chrome’s share window pick the Chrome Tab pane and turn “Also share tab audio” on. Sendspark then captures both the tab’s video and its audio. In the desktop app, just record as usual.
What's the difference between tab audio and system audio?
What's the difference between tab audio and system audio?
They’re the same toggle under two names, and which one you see depends on the pane. The Chrome Tab pane shows “Also share tab audio” and captures sound from the one tab you selected. The Entire Screen pane shows “Also share system audio” and captures everything your computer plays.
Can I record my voice and the system audio together?
Can I record my voice and the system audio together?
Yes. You can enable both your microphone and the computer audio toggle so your voice and the system sound are recorded at the same time.
Which browser is required?
Which browser is required?
This method needs Google Chrome with the Sendspark Chrome Extension. If you’d rather not be tied to Chrome, the desktop app records system audio automatically.