Key takeaways
- You can send dynamic videos in Marketing Hub, use the Chrome extension for instant videos, install the native app for Workflows, and view analytics in HubSpot.
- Install the app from the integrations settings by clicking CONNECT on the HubSpot App Connection option.
- Engagement events (Video Visited, Played, Watched, Liked, and CTA Clicked) appear as timeline events on each contact record.
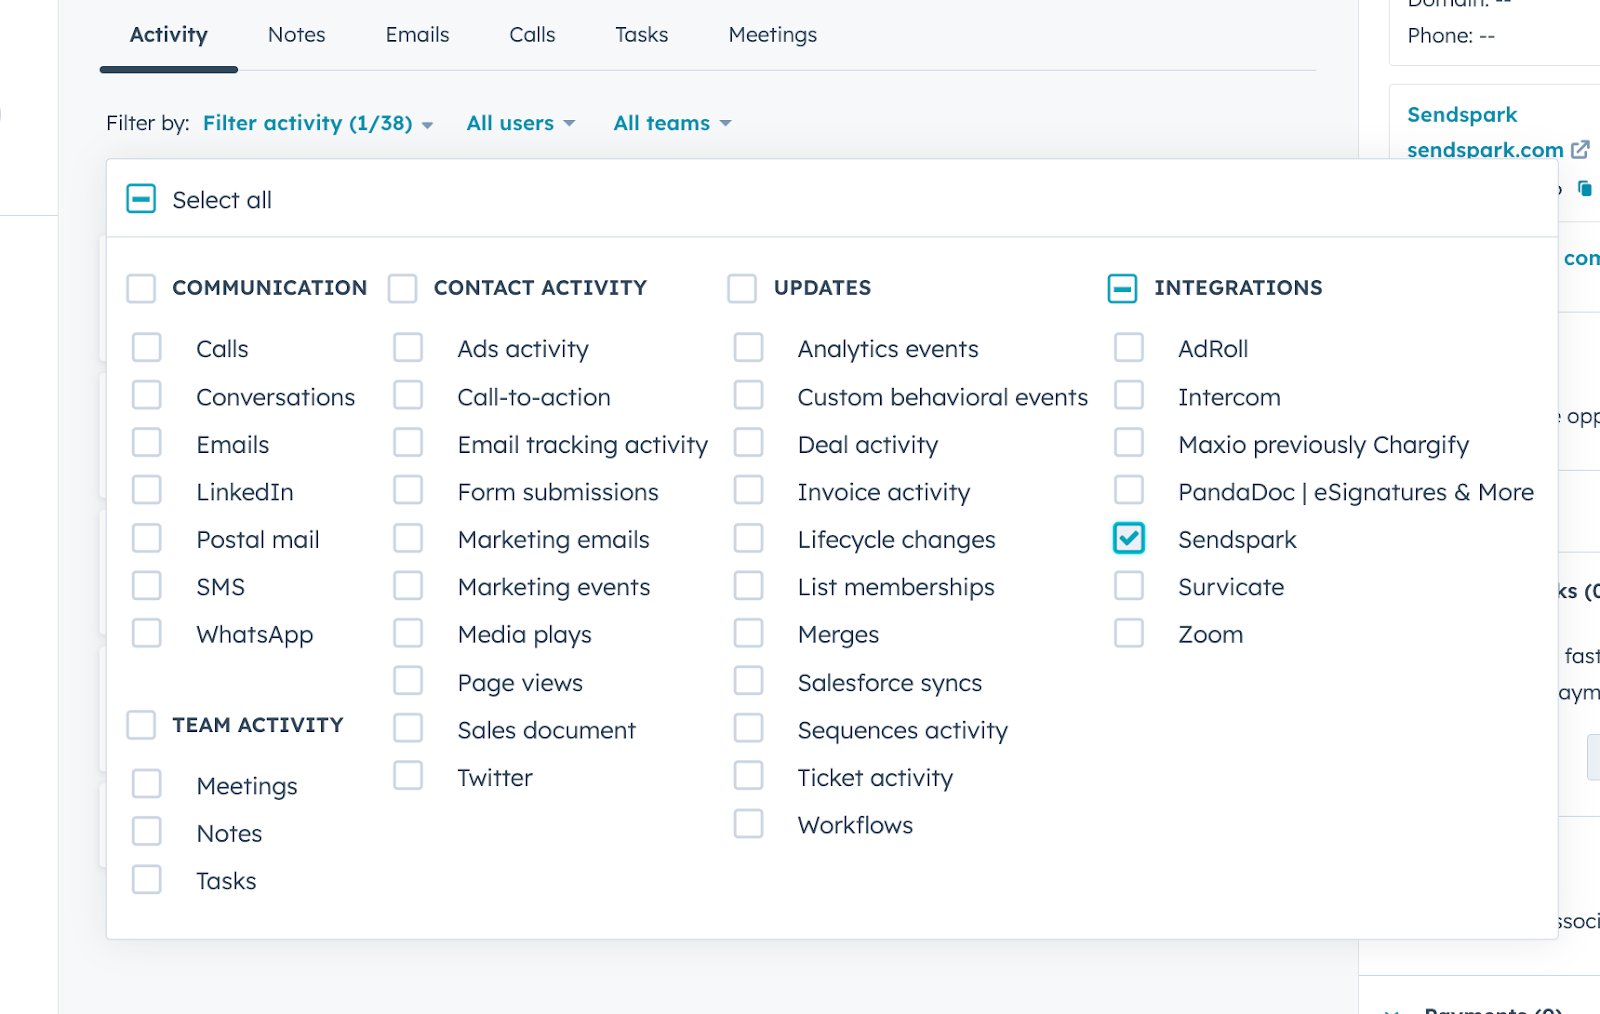
- Timeline events are not enabled by default. Click “Filter Activity” and select “Sendspark” to see them.
- You can use these events in HubSpot lists and automations to reach out to contacts based on what they did (or didn’t do) in Sendspark.
- Send Dynamic Videos in Marketing Hub
- Send instant videos with the Chrome extension
- Install the Sendspark Native app in Hubspot for Workflows
- See viewer data & analytics in HubSpot
1. Send Dynamic Videos in Marketing Hub
For more details, read the article for sharing dynamic videos in HubSpot Marketing emailsor sharing dynamic videos in HubSpot Sales Sequences.
For a deeper understanding of regular and dynamic videos, refer to the ‘Understanding Regular and Dynamic Videos’ section above.
2. See viewer data & analytics in HubSpot
We have a specific article for this process: Hubspot: Instant Integration (Chrome Extension)3. Install the App in HubSpot
Head to the integrations section and click CONNECT over the Hubspot App Connection option to follow the installation steps: https://sendspark.com/settings/integrations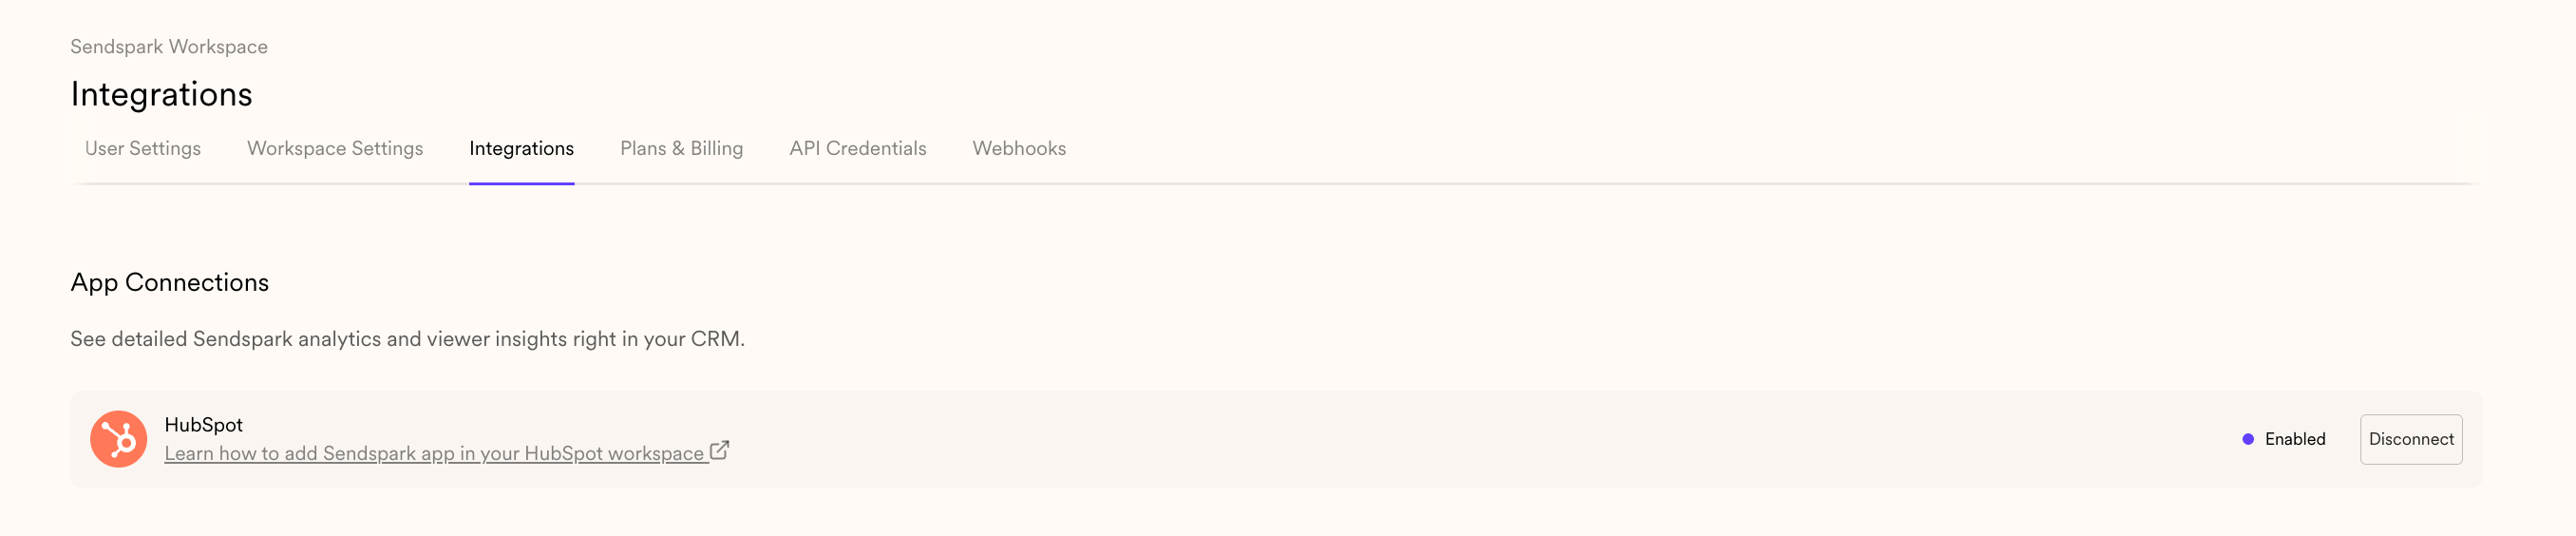
4. See viewer data & analytics in HubSpot
Once your contacts watch your videos, you will start seeing video engagement data in HubSpot. Here is the data that you’ll be able to see:- Video Visited– Tells you that someone visited a video page
- Video Played– Tells you that someone has clicked “play” on your video
- Video Watched – Will tell you what percentage of a video someone watched
- Video Liked– Tells you that someone has liked your video
- Video CTA Clicked– tells you that someone has click the call-to-action on your video

- Click**“Filter Activity”**
- Select “Sendspark”
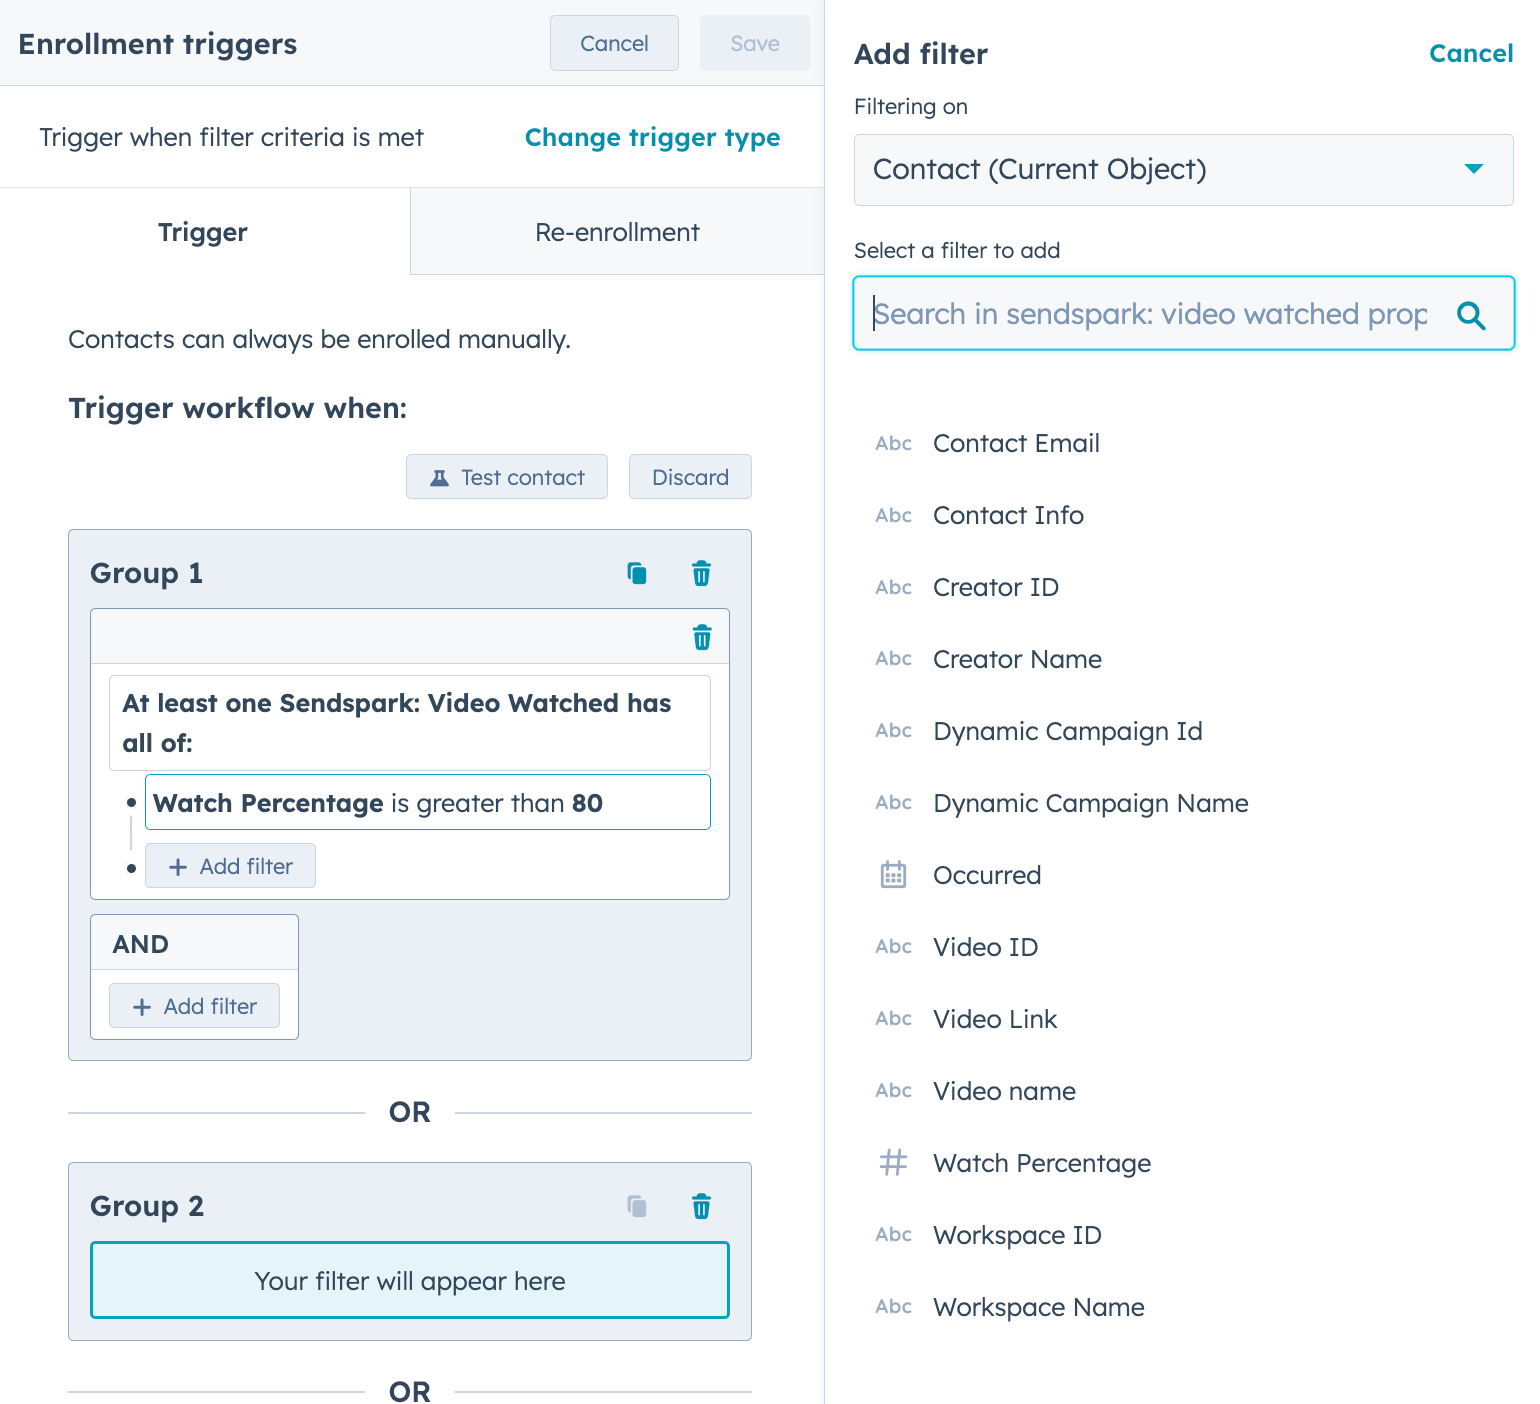
- Contact Email– refers to the email address of the contact who watched the video
- Contact Info – refers to the name of the name contact who watched the Sendspark video, if it’s available
- Creator ID– refers to the ID of the team member in your Sendspark workspace who created the video
- Creator Name – refers to the name of the team member in your Sendspark workspace who created the video
- Dynamic Video Campaign ID – refers to the ID of the dynamic video campaign that the viewer watched, if they watched a dynamic video. You can find this by looking in the URL of the dynamic video campaign you have created
- Dynamic Video Campaign Name – refers to the name of the dynamic video campaign that the viewer watched, if they watched a dynamic video.
- Occurred – refers to the date that the video was watched
- Video ID – refers to the ID of the video the contact watched. You can find this by looking for the string text in the video share URL
- Video Name – refers to the name of the video
- Video Link – refers to the URL of the video that was watched
- Watch Percentage – refers to the percentage of the video that was watched
- Workspace ID – refers to the Sendspark workspace this video was created in. You can find this value in your workspace settings.
- Workspace Name – refers to the name of the workspace this video was created in.
Frequently asked questions
What can I do with Sendspark in HubSpot?
What can I do with Sendspark in HubSpot?
You can send dynamic videos in Marketing Hub emails, send instant videos with the Chrome extension, install the native Sendspark app for HubSpot Workflows, and see viewer data and analytics inside your CRM.
How do I install the Sendspark app in HubSpot?
How do I install the Sendspark app in HubSpot?
Head to the integrations section and click CONNECT on the HubSpot App Connection option, then follow the installation steps.
What video engagement data shows up in HubSpot?
What video engagement data shows up in HubSpot?
Once contacts watch your videos, you’ll see Video Visited, Video Played, Video Watched (with the percentage watched), Video Liked, and Video CTA Clicked events on each contact’s timeline.
Why aren't Sendspark events showing on the contact timeline?
Why aren't Sendspark events showing on the contact timeline?
Sendspark timeline events are not enabled by default. On the contact record, click “Filter Activity” and select “Sendspark” to display them.
Can I use Sendspark video engagement in lists and automations?
Can I use Sendspark video engagement in lists and automations?
Yes. The video engagement events are available in HubSpot lists and automations, so you can reach out to users who have taken (or not taken) certain actions in Sendspark.